Easy Grinch Cookies: Your Ultimate Cake Mix Holiday Recipe Guide
The holiday season is synonymous with warmth, joy, and, of course, delicious baking. Among the myriad of festive treats, few capture the whimsical spirit of Christmas quite like a batch of vibrant green Grinch cookies. These delightful crinkle cookies, inspired by everyone's favorite green anti-hero whose heart grew three sizes, are not only a feast for the eyes but also incredibly simple to make, thanks to a clever cake mix shortcut. Imagine soft, chewy sugar cookies with a snowy powdered sugar crinkle, each adorned with a tiny red heart, ready to bring a smile to every face. This comprehensive guide will walk you through creating these iconic holiday treats with ease, ensuring your baking experience is as joyful as the season itself.
Why Cake Mix Grinch Cookies Are Your Holiday Baking MVP
In the hustle and bustle of holiday preparations, time is a precious commodity. This is where the magic of using a cake mix for your Grinch cookies truly shines, transforming a potentially lengthy baking process into a quick and enjoyable activity. Here's why a cake mix makes these `grinch cookies` an essential addition to your holiday repertoire:
*
Effortless Preparation: A pre-packaged cake mix significantly cuts down on the measuring of dry ingredients. No need for multiple bags of flour, sugar, baking soda, and salt; it’s all perfectly pre-portioned, guaranteeing consistent results every time. This shortcut means less time fussing with ingredients and more time enjoying the baking process.
*
Guaranteed Soft & Chewy Texture: Cake mixes are expertly formulated to produce light, tender, and moist cakes, and these properties translate beautifully into cookies. You'll end up with Grinch cookies that are wonderfully soft and chewy, a delightful contrast to the crisp crinkle coating.
*
Beginner-Friendly: If you're new to baking or simply prefer a foolproof method, cake mix cookies are incredibly forgiving. The simplified ingredient list and straightforward steps make it almost impossible to go wrong, building confidence for even the most novice bakers.
*
Kid-Friendly Fun: The ease of this recipe makes it perfect for involving younger family members. Kids will love helping to mix the dough, watching it transform into a vibrant green, and especially rolling the cookie balls in powdered sugar – not to mention pressing on those adorable red hearts!
*
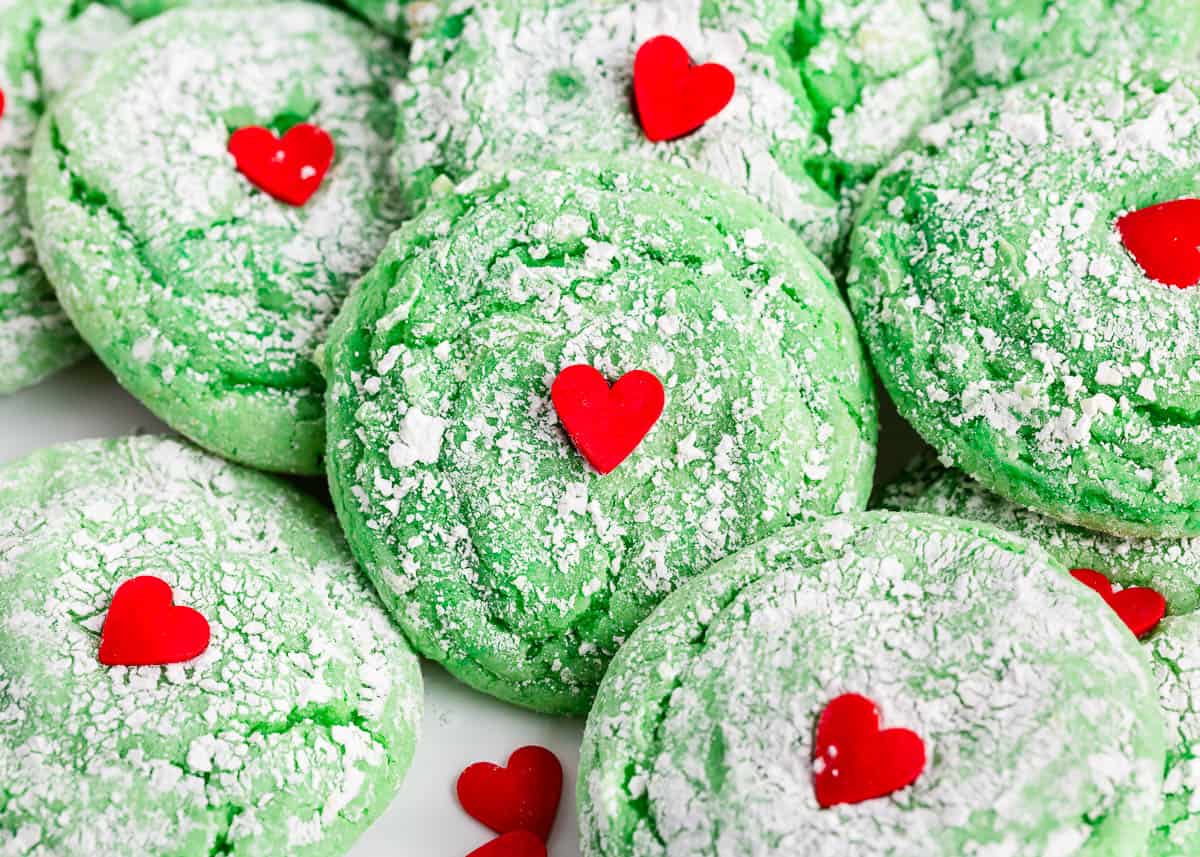
Festive Appeal: Beyond their taste, these `grinch cookies` are a visual spectacle. The bright green color is instantly recognizable, and the snowy crinkle pattern provides a beautiful contrast, making them a stunning addition to any holiday dessert platter, cookie exchange, or simply as a cozy fireside treat.
Essential Ingredients for Your Whimsical Grinch Cookies
Crafting the perfect batch of Grinch cookies requires a handful of common pantry staples, with a couple of key ingredients to achieve their signature look and texture. Here’s what you’ll need to gather for your holiday baking adventure:
*
White or Vanilla Cake Mix (15.25 oz): This is the foundation of our easy recipe. Opt for your favorite brand. A white or vanilla flavor works best as it provides a neutral base, allowing the green food coloring and other flavors to shine through without competition.
*
Two Large Eggs: Essential binders that give your cookies structure and help hold everything together.
*
Vegetable Oil: Provides moisture and contributes to the soft, chewy texture. Canola oil is a perfectly acceptable alternative.
*
Vanilla Extract (Pure Recommended): Enhances the overall flavor profile of your cookies. While you can omit it if your cake mix has a strong vanilla flavor, a dash of pure vanilla extract always elevates the taste.
*
Green Food Coloring: The star of the show! Gel food coloring is recommended for its intense color payoff, allowing you to achieve that iconic Grinch green with fewer drops. Liquid food coloring also works, but you might need a bit more to reach your desired shade. Start with a few drops and add more gradually until you hit the perfect hue.
*
Powdered Sugar: Crucial for the snowy, crinkle effect on the outside of the cookies, adding an extra touch of sweetness and visual appeal.
*
Cornstarch: This secret ingredient is key to achieving that beautiful, pronounced crinkle. When mixed with powdered sugar, it prevents the sugar from melting and soaking into the cookie dough during baking, ensuring a distinct, snowy coating. If cornstarch isn’t available, arrowroot powder or tapioca starch can be used as substitutes. You can also make these delightful crinkle cookies this Christmas by following a similar technique as detailed in
Bake Whimsical Grinch Crinkle Cookies This Christmas.
*
Red Heart Sprinkles or Candies: The ultimate finishing touch, symbolizing the Grinch's magically growing heart. Small, flat candy hearts or red heart sprinkles work best.
Step-by-Step Guide to Baking Perfect Grinch Crinkle Cookies
Ready to bring these whimsical Grinch cookies to life? Follow these simple steps for a baking experience that’s as fun as it is rewarding.
1.
Combine Wet and Dry: In a large mixing bowl, add your cake mix, eggs, vegetable oil, and vanilla extract (if using). Using a hand mixer or stand mixer, mix on medium speed until all ingredients are just combined and a thick, soft dough forms.
2.
Go Green with Envy: Now for the fun part – adding the color! Add your green food coloring one drop at a time. Gel food coloring provides a more intense color, so start with 3-5 drops and mix on low speed until the color is evenly distributed. Continue adding drops and mixing until you achieve your desired Grinch-green shade. Ensure it's fully incorporated with no white streaks.
3.
Chill Out: Cover your bright green cookie dough with plastic wrap and chill it in the refrigerator for 30-60 minutes. This step is crucial as it helps firm up the dough, making it much easier to handle and roll into balls. Don't skip this, especially since cake mix doughs can be quite sticky!
4.
Prepare the Crinkle Coating: While the dough chills, whisk together the powdered sugar and cornstarch in a shallow bowl. The cornstarch is vital here; it creates a barrier that prevents the powdered sugar from completely melting into the cookie during baking, giving you that beautiful snowy crinkle effect.
5.
Scoop, Roll, and Coat: Once the dough is chilled, preheat your oven to 375°F (190°C) and line a baking sheet with parchment paper or a silicone baking mat. Using a cookie scoop (about 1-2 tablespoons in size), portion out balls of dough. The dough will still be sticky, but once it drops into the powdered sugar mixture, it becomes much easier to manage. Roll each dough ball generously in the powdered sugar and cornstarch mixture until it's completely coated. Place the coated balls about 2 inches apart on your prepared baking sheet.
6.
Bake to Perfection: Bake the cookies for 8-10 minutes. Keep a close eye on them; you want the centers to be just set, but the cookies should not start to brown around the edges. Overbaking will result in a drier cookie, and we're aiming for soft and chewy perfection.
7.
The Heart Grows: As soon as the cookies come out of the oven and are still warm, gently press a red heart sprinkle or candy into the center of each cookie. The residual heat will help it adhere. After 3-5 minutes on the baking sheet, transfer the Grinch cookies to a wire rack to cool completely. Once cool, they're ready to bring holiday cheer!
Tips & Tricks for Grinch Cookie Mastery (and Flavor Twists!)
Elevate your Grinch cookie game with these expert tips and delightful flavor variations:
*
Achieving the Perfect Crinkle: Don't be shy with the powdered sugar mixture! A thick, even coating is essential for a pronounced crinkle pattern. Re-roll any balls that look patchy. If you don't have cornstarch, you can still roll the cookies in just powdered sugar, though the crinkle might be slightly less defined.
*
Preventing Green Streaks: When adding the green food coloring, ensure you mix the dough thoroughly. Scrape down the sides of the bowl to catch any uncolored bits and mix again on low speed until the color is uniform throughout.
*
Don't Overbake: This is crucial for maintaining the soft, chewy interior. Cookies will continue to set slightly as they cool. If they look barely done in the center but the edges are set, they're likely perfect.
*
Experiment with Flavors: While vanilla is classic, feel free to get creative! Add a few drops of peppermint extract to the dough for a minty twist, or almond extract for a subtle, nutty undertone. For a truly unique flavor, consider adding finely crushed pistachios or even a touch of pistachio pudding mix (like in some other popular `grinch cookies` recipes, such as those that produce
Pistachio Grinch Cookies: Soft, Chewy & Kid-Friendly) to the dough for an extra layer of taste and texture.
*
Heart Placement Timing: Pressing the red heart sprinkles onto the warm cookies straight out of the oven ensures they stick without melting or losing their shape in the heat of the oven.
*
Storage: Store your cooled Grinch cookies in an airtight container at room temperature for up to 3-5 days. They stay wonderfully soft and delicious, perfect for snacking throughout the holiday week.
Conclusion
These easy Grinch cookies, made effortlessly with a cake mix, are more than just a holiday treat; they're a joyful expression of the Christmas spirit. With their vibrant green hue, snowy crinkle, and symbolic red heart, they perfectly capture the whimsical transformation of the Grinch, reminding us that even the smallest hearts can grow with a little love and kindness. Whether you're baking them for a festive gathering, a cookie exchange, or simply to enjoy by the fire, these delicious and simple `grinch cookies` are guaranteed to bring smiles and make your holiday season a little brighter. So gather your ingredients, turn on some holiday tunes, and get ready to bake a batch of pure Christmas magic!